 To find great technical articles, from learning how to read the Thunderbird data plate to installing disk brakes, go to the CTCI web site: WWW.CTCI.ORG and look for the “Car Tech” tab. Follow the links to the information you are interested in. Many articles written by Gil Baumgartner and other Thunderbird enthusiast are presented.
If you have a technical article to share with Thunderbird members please email to the SCVT Website Editor. Be sure to include JPEG pictures and a complete description and/or instructions.
Soft Top Zipper Tip:
From the Virgina Classic Thunderbird Club newsletter, “T-Bird Times.”
The large zipper that holds the rear window onto the soft top can be very hard to re-zip. If this is the case, rub some Chap Stick onto the teeth of the zipper. You will be amazed at how much easier the zipper works! Thank you Tom Chapley for this great tip!
What should be the color of your Steering Wheel?
Cigarette Lighter Fuse:
For those who care, the fuse on the cigarette lighter on a T-Bird is of the non-burn-out type and does not have to be replaced. Remove the fuse from the back of the lighter socket. Insert a small wire or nail in the hole in the end of the fuse and press until you hear a snap. The fuse is now reset and as good as new.
Spark Advance Check/Repair:
Refer to the May 2015 FAN for the Technical information.
When to replace radiator coolant:
We all know that we are supposed to replace engine coolant before it degrades into a good electrical conductor that corrodes the heater core, radiator, water pump and other metal parts. Some coolant makers recommend changing after five years, others say seven years. However we generally don’t know when is the right time to do that. This is a way to use an inexpensive digital multi-meter to determine if the coolant that is in your engine is preventing or encouraging electrolytic corrosion. Switch the multi-meter to one of its lowest DC voltage settings. Remove the radiator cap from the cold radiator, place the positive meter probes into the coolant and connect the other to a good ground or to the battery negative terminal. Start the engine and let it come up to operating temperature so that the thermostat opens and the coolant is circulating throughout the cooling system. If the voltage reading is 0.4 volts or more the coolant has reached the end of its life and is encouraging electrolytic corrosion and should be replaced. If the voltage is less than 0.4 volts the coolant is good for continued use. The lower the voltage the better the condition is. It is also necessary to use an anti-freeze tester to check the freezing point of the coolant.
Penetrating Oils:
Machinist’s Workshop magazine recently published some information on various penetrating oils that I found very interesting. Some of you might appreciate this. The magazine reports they tested penetrates for break out torque on rusted nuts. They are below, as forwarded by an ex-student and professional machinist. They arranged a subjective test of all the popular penetrates with the control being the torque required to remove the nut from a “scientifically rusted” environment.
Penetrating oils Average torque load to loosen
-
- No Oil used 516 pounds
-
- WD-40 238 pounds
-
- PB Blaster 214 pounds
-
- Liquid Wrench 127 pounds
-
- Kano Kroil 106 pounds
- ATF*-Acetone mix 53 pounds
The ATF-Acetone mix is a “home brew” mix of 50 – 50 automatic transmission fluid and acetone. Note this “home brew” released bolts better than any commercial product in this one particular test. Our local machinist group mixed up a batch and we all now use it with equally good results. Note also that “Liquid Wrench” is almost as good as “Kroil” for about 20% of the price. Steve from Godwin-Singer says that ATF-Acetone mix is best, but you can also use ATF and lacquer thinner in a 50-50 mix.
*ATF=Automatic Transmission Fluid
Quick Test For Generator Operation:
This Tech Tip is from the May 2017 issue of the Valley Classic Thunderbird Club newsletter. Thanks to the club and the author, Marvin Friedman.
When the ubiquitous red light on the cluster illuminates with “GEN”, it’s not always obvious what it means. It is telling you that the generator is not functioning, but it’s not always the generator’s fault. The battery, generator, and regulator must all work in concert to keep that dam GEN lite turned off.
Simply put, the generator is a current amplifier that sends out current to recharge the battery upon command from the voltage regulator. As the battery recharges, its voltage rises. On a 12-volt system, it will rise to 14.7 volts, at which time the regulator reduces the field current to the generator, which in tum, reduces the charging current to the battery. As lights, heater, radio, or other loads take POWER (volts X amps) from the battery, it’s voltage again begins to fall, and the regulator again sends current to the field windings of the generator, which, in turn, causes the generator to again charge the battery (this simplification ignores the fact that the regulator actually tapers the charge off and on, rather than just switching it on and off, but for this article, this is not an important detail). The regulator also has relays which measure the current and voltage out of the generator to make sure they do not exceed preset limits.
A quick test of the generator can be done by disconnecting the FIELD (F) wire at the regulator and momentarily ( couple of seconds) touching it to the BATTERY (B) terminal at the regulator while the engine is running slightly above idle. If the GEN light goes out while doing this, look to the regulator for the problem. If the light stays on, get the wrenches out and remove the generator – what you have done is to bypass the regulator and send maximum field current to the generator, which should force the generator (if good) to produce current output. Don’t open the regulator and start fiddling with the relays inside. This is a precisely adjusted instrument, whose settings are temperature dependent, and you’re not going to “fix” it by bending or “polishing” its contacts. If the contacts stick, or are shorted together improperly, you’ll likely burn out the resistor wires on the underside of the regulator.
If you’re not hung up on authenticity, consider replacing the generator with an alternator. This unit was not available at the time these cars were made, and represents a tremendous improvement in reliability. They are physically smaller than generators, and can be fitted into the available space with no modification to the brackets or support members. Modification kits are available. Check the usual sources.
Idler Arm Bushing:
This Tech Tip is from the April 2017 issue of The Roadrunner newsletter. Thanks to the Palm Springs Classic Thunderbirds Club.
The power steering idler arm bushings are more than likely one of the most misunderstood parts in the steering system. In order to replace these bushings, the old ones must be pressed out. The new short bushing is then pressed into the steering arm. The long bushing is pressed into the idler arm bracket that attaches to the frame on the passenger side. The inside sleeve has serrated teeth on both ends. When the idler arm is installed in the bushings the serrated teeth are designed to grab the idler arm at the bottom of the shaft and grab the large washer at the top of the shaft (threaded end). When replacing the idler arm, insure that the steering is aligned straight ahead before the nuts are tightened. The inner serrated sleeve is designed to contact the idler arm and large washers. This allows the inner sleeve to lock in place and the outer sleeve to turn which creates tension on the rubber sleeve allowing the bushings to act as a centering mechanism.
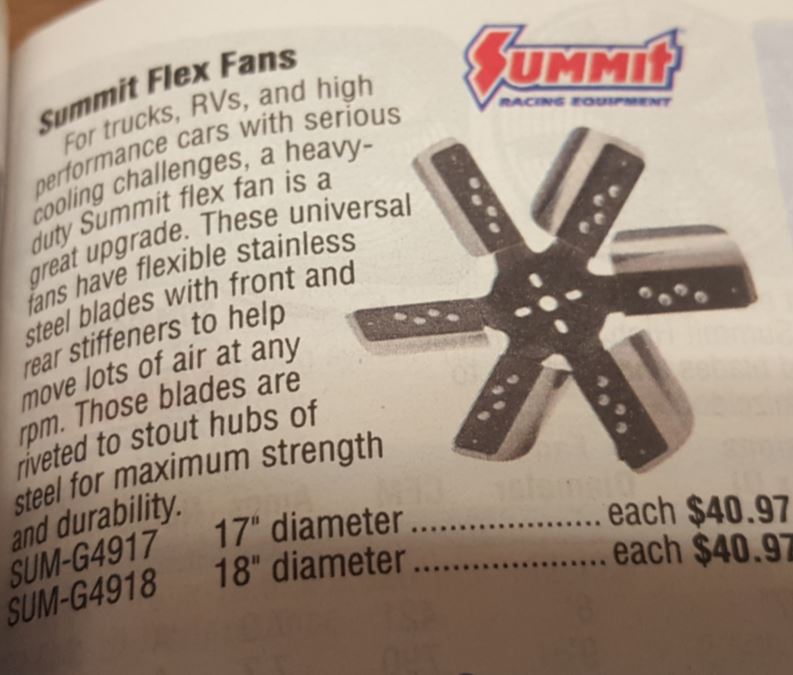
Flex-Cooling Fan from Summit Auto:
Dick Osgood did a study about the cooling for our Thunderbirds and found that one of most important issues with running cool is to remove the heat from the engine compartment. Further researching resulted in finding a Flex-Fan from Summit Auto that will really push the hot air out of the engine compartment. Below is a picture from the Summit Auto catalog showing the Flex-Fan.
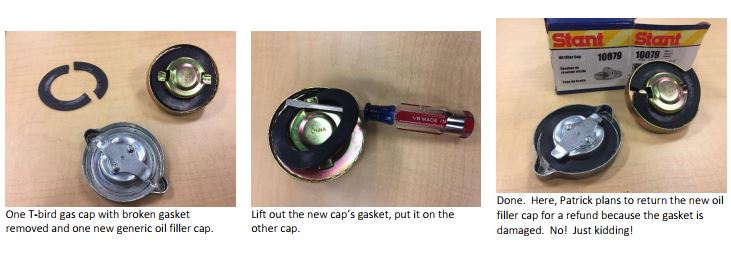
Gas Cap Repair:
Patrick Ford shows how to repair the gasket on the gas cap.
Use the gasket from a common oil filler cap, Stant 10079, (about $6) to replace a damaged gasket on an original or repro gas cap (about $23).
A less expensive option is to purchase a gasket from a plumbing supply:
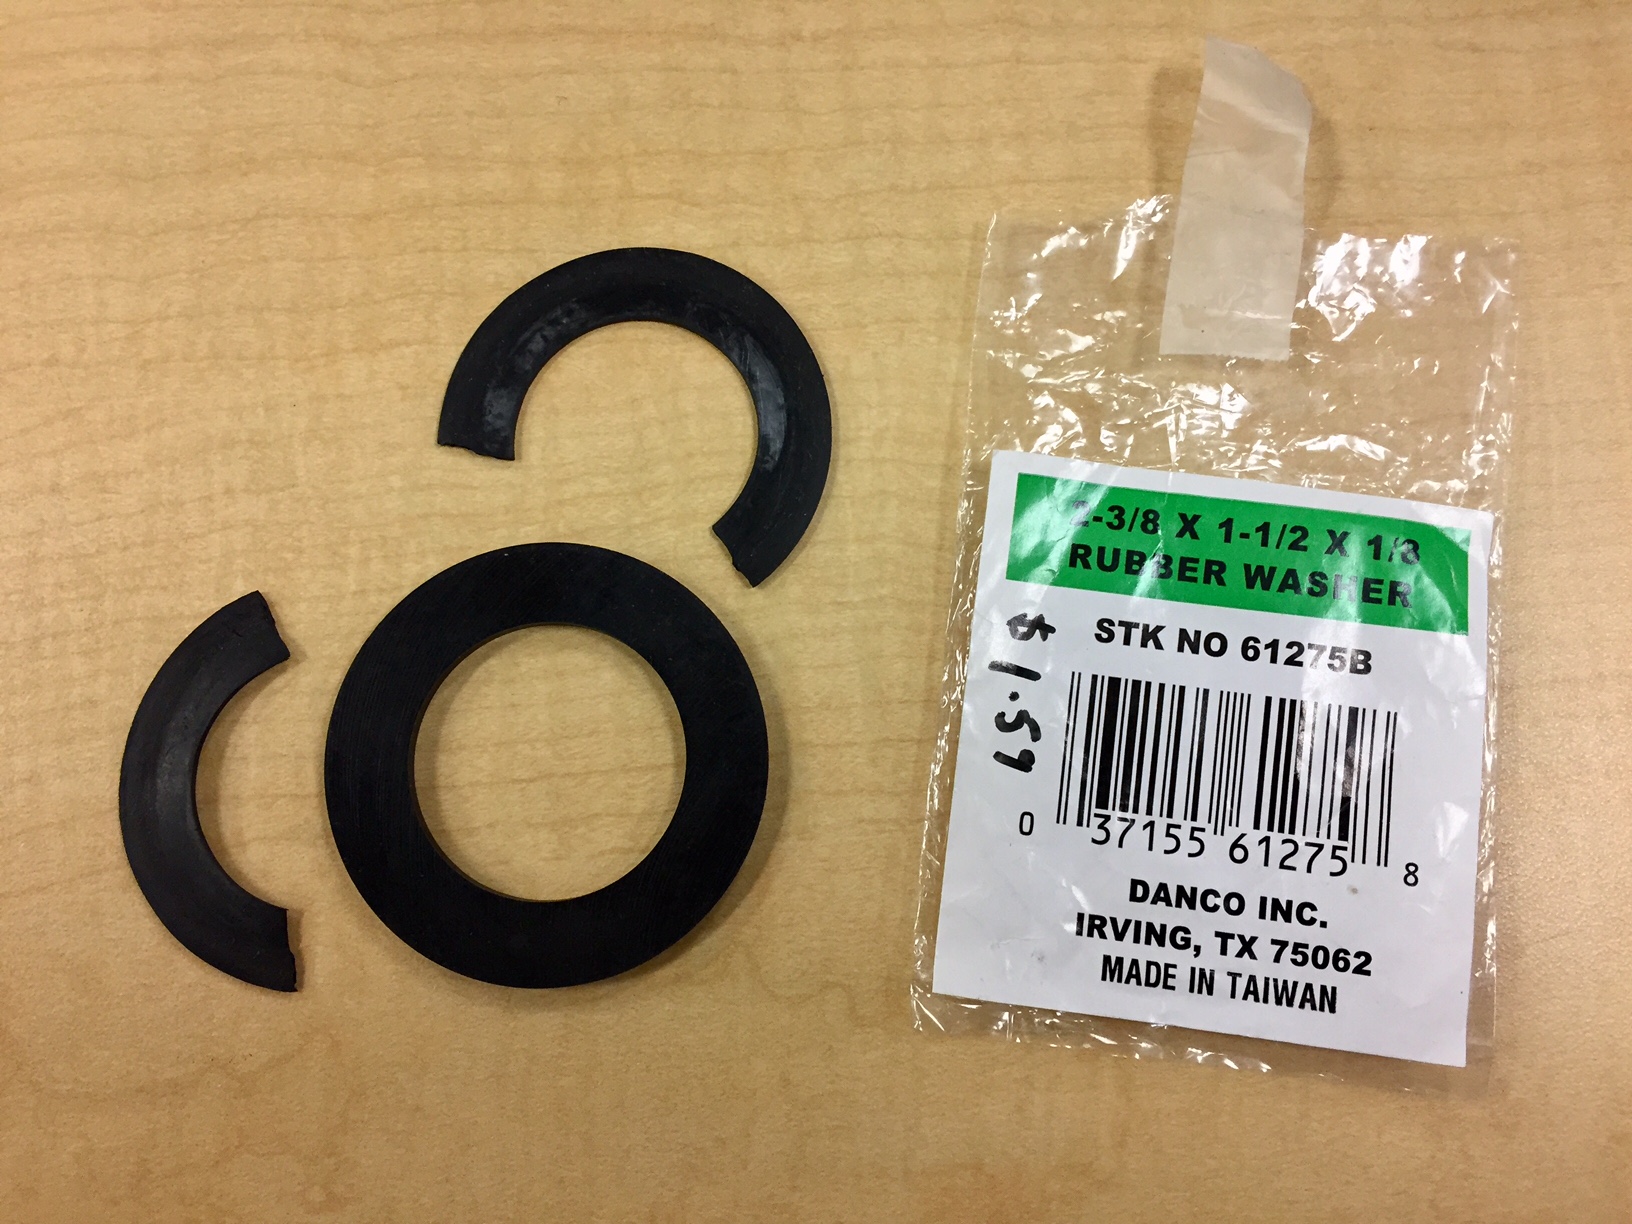
Gas Cap Gasket Repair
Cigarette Lighter / Accessory Power Outlet Fuse
Not many folks still use the cigarette lighter for its originally intended purpose. However, it’s useful as an auxiliary power source for other plug-in electronics such as a portable air pump for inflating tires, a CB radio or, with a USB adaptor in the socket, to charge or use cell phones.
At our last club meeting, Bill Mann talked about the importance of having a fuse for the cigarette lighter: If you plan on using the lighter socket and it doesn’t currently work, be certain that the fuse (as originally equipped) is not missing from the back of the socket or has an in-line fuse installed. Bill showed an example where the socket had no fuse attached, no in-line fuse installed and the result was a badly burned wire which could have led to more serious trouble. The early Birds did not use replaceable fuses: “For those who care, the fuse on the cigarette lighter on a T-Bird is of the non-burn-out type and does not have to be replaced. Remove the fuse from the back of the lighter socket. Insert a small wire or nail in the hole in the end of the fuse and press until you hear a snap. The fuse is now reset and as good as new.” – Valley Classic Thunderbird Club newsletter, October, 2015
Trunk Lock will not open:
By Dave Campbell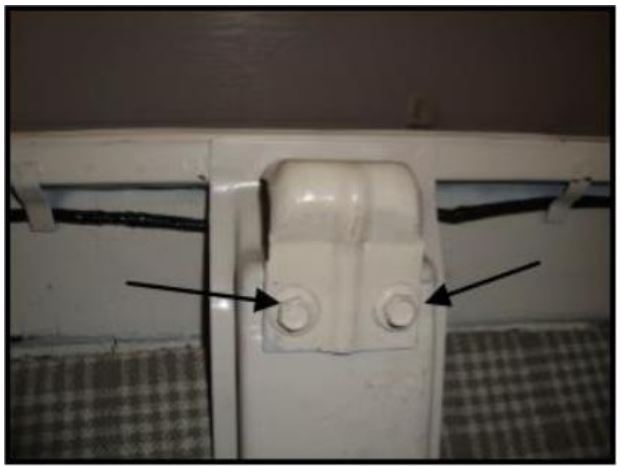
At the Dream Cruise, my trunk lock broke with the lid in the locked position. The question is: how do you get the trunk open to make the repair? The answer is to use a ½” socket with 3½ to 4 feet of extensions. Run the socket through the space behind the seat. Remove the two bolts that attach the catch to the lower body panel of the trunk opening as shown in this picture. Once the bolts are removed the trunk will pop open and repairs can be made.
Boiling Point
By Bob DePaola
Did you know the boiling point of your coolant can be increased or decreased by changing your radiator cap?
The following table explains boiling points (degrees Fahrenheit) for water at different pounds per square inch
(PSI).
CAP PSI BOILIING POINT
6 212°F
10 239°F
15 250°F
20 259°F
The mixture of antifreeze also changes the boiling point as indicated on the antifreeze container.
Why is the fuel filter glass bowl only half full?
By Bob DePaola
The T-Bird AC fuel filter with glass bowl will often have some air trapped in it because it is not forced through because fuel flows more freely into the bottom of the filter element and on out to the carb. You may vent the air off by loosening off on the glass bowl while the engine is running but the bubble will return if any air is pumped in to filter unit. The air bubble is normal in a filter unit of this type. If you chose to run the engine without the element in the fuel filter unit, you will see that the air passes on through and no bubble will accumulate. If air does not accumulate in the glass bowl, there is a good chance that the filter element is ineffective and fuel and air is bypassing the element.
HOW TO REMOVE THESE ITEMS:
Ignition & trunk lock tumblers?
After you remove the ignition switch or trunk lock housing, insert the key, turn clockwise 45 degrees, and push down the retaining button at the rear of the tumbler assembly through the hole in the housing. The tumbler will then pull out easily. To reinstall use the reverse procedure, when the key is turned the retaining pin will be pushed up and the assembly will be locked into place.
Headlight switch control shaft?
Push down the spring loaded button on the headlamp switch;
this should release the shaft. Some pushing-pulling-wiggling may be necessary.
Overheating Tip
Here’s a tip that may help you keep your cooling system in top shape. Spray the fan side of the radiator with a water-soluble cleaner such as Simple Green or Gunk Engine Degreaser, let it soak in, and then flush with a fine spray from your garden hose. Be sure not to use too much water pressure as you might close the radiator fins. A radiator with clean fins will cool more efficiently.